Thứ Năm, 29 tháng 9, 2011

Craft lessons: Waldorf Finger Knitted Flowers, video tutorial

Fingerknitted Flowers

One thing I would love to have in my house is live plants or better yet, fresh flowers, but with two kitties it's just not an option. So, I had to improvise...

A bouquet of cat and kid friendly, all natural, homemade flowers. I found a video tutorial
They were quick and easy to make - I simply fingerknitted the flowers and sewed them onto the branches from our wool tree.


Craft lessons: Waldorf Finger Knitted Flowers, video tutorial

Unique jewelry making: Paperclip earrings tutorial


Unique jewelry making: Paperclip earrings tutorial

Long time ago I sow interesting handmade earrings. They were made out of paperclips. They looked really pretty. It wasn't like that I would weare office supplies. I decided that they are "must make", but, eventually, I completely forgot on them. Few days ago I tumbled on them again. This time, I didn't gave them time to disapire. I hope that you like my version.

Orginalne je napravila evie-s.com. Prekrasne su! / These are original ones made from evie-s.com. They are beautifull.


I što je najbolje, pokazati ću vam, korak po korak, kako možete napraviti svoje unikatne naušnice.

The best thing is that I will show you how to make unique earrings on your own.


Zalijepi čipku običnim ljepilom / Glue the lace with regular glue


I can't wait to get some white lace. Or creamy one...

Craft fashion for kids: rainbow shirt tutorial


Craft fashion for kids: rainbow shirt tutorial
i drew out a pattern,

used the pattern to cut my fabric,

and sewed it onto a white shirt.

i love it! i ended up not using purple...which she pointed out when it was finished.

Unique Gifts presents: Mr. Bunny, amirugumi crochet patterns


Unique Gifts presents: Mr. Bunny, amirugumi crochet patterns


Ears (make two)

Rnd 1: 6 sc in a circle
Rnd 2: 2 sc in each sc around (12)
Rnd 3-10: sc around
Stuff


Tail

Rnd 1: 6 sc in a circle
Rnd 2: 2 sc in each sc around (12)
Rnd 3-4: sc around
Doesn't need to be stuffed

Feet (make four)

Rnd 1: 8 sc in a circle
Rnd 2: 2 sc in each sc around (16)
Rnd 3-4: sc around twice
To give weight and flatness to the feet I put small decorative glass stones in them before sewing them to the body.

Mustache (make two)

Rnd 1: 4 sc in a circle
Rnd 2: sc in next st then ch 5
sc in 2nd ch from hook
sc 6 along ch and into round, sl st in next st

Body

Rnd 1: 6 sc in a circle
Rnd 2: 2 sc in each st around (12)
Rnd 3: *sc then sc twice in next st* repeat around (18)
Rnd 4: *sc in next two st then sc twice in next st* repeat around (24)
Rnd 5: *sc in next three st then sc twice in next st* repeat around (30)
Rnd 6: *sc in next four st then sc twice in next st* repeat around (36)
Rnd 7-21: sc around
Rnd 22: *decrease then sc in next four st* repeat around (30)
Rnd 23: *sc in next three st then decrease* repeat around (24)
Rnd 24: *decrease then sc in next two st* repeat around (18)
Put in eyes, sew on mustache and ears. Stuff.
Rnd 25: *sc then decrease* around (12)
Rnd 26: decrease around (6)
Rnd 27: decrease once more then break thread and sew up hole.
Sew on tail and feet.

Heart and Food gifts: Mini-Mozzarella Chicks & Cherry Tomato Skewers

 Carving duck and heart tutorial


A neat snack for your spring theme party or Easter celebration: mozzarella chicks marinated in curry and cherry tomatoes on a stick. Easy to make and it will sure impress kids or grown-up lovers of cute food. You can serve these skewers as a party snack, garnish salads with it, take them to a picnic or put them in a lunchbox.
I prepared these skewers before Easter but didn’t find time to post it until now, sorry :-P
There’s this gorgeous food blog called L’exquisit where I’ve seen these neat Italian lollies made with mini-mozzarella and cherry tomatoes. I really like the presentation and wanted to make something similar. In the end, it turned out to look quite different but oh well, the ingredients are still alike.

How to make Mozzarella Chicks & Cherry Tomato Skewers
  • mini-mozzarella (if you can’t get your hands on this, you can probably replace it by scooping out balls from other cheeses like gouda, etc. Cube-shaped pieces might be nice as well. Or smash and mix feta with cream cheese to form little balls.)
  • curry powder
  • carrot
  • black sesame
  • cherry tomatoes (must be oval-shaped if you want to make hearts)
    1. Marinate the mozzarella in a 1:3 curry-water mixture for about an hour, then rinse gently with cold water. Pierce mozzarella and cherry tomatoes with a skewer.
    1. Cut out a triangle from a carrot like shown in the picture and then slice it thinly with a knife or mandolin slicer.
    1. Slit the mozzarella a little and place 2 carrot triangles inside.
    1. Pierce 2 holes with a toothpick and stick in 2 black sesame seed.
    1. For making heart-shaped cherry tomatoes, refer to this post: http://eyecandy.nanakaze.net/?p=128


Heart and Food gifts: Mini-Mozzarella Chicks & Cherry Tomato Skewers

Autumn Leaves for a spring baby: knitting patterns and tutorial

http://img98.imageshack.us/img98/5396/hinh0154.jpg

Autumn Leaves for a spring baby: knitting patterns and tutorial

I came across a mysterious tweedy wool with all the colors of Fall, and loved it. Though of course the leaves on the yoke could easily be spring green or even flower petals.

Don’t be dismayed by the number of rows in this pattern—it’s actually very intuitive.  And now, thanks to the spectacular efforts of Lily Ryan, we have a chart!

Sizes:
6-9 months, 9-12 months, (12-15 months)

Materials:
200, 250, (300) yards DK, DK or worsted weight depending on how tight you like your weave, (worsted weight) wool.
US 5 20-in circular needle, US 7, (US 9)
Tapestry needle
4 stitch markers
6, 7, (8) buttons

Gauge:
24.5 sts/32.5 rows=4 inches using US 5 needles, 18 sts/29 rows=4 inches using US 7 needles, (15.5 sts/23 rows=4 inches using US 9 needles).


Pattern:

Choose whichever needle size for whichever size sweater you are making, and follow the pattern from there.

CO 55 sts
Work 2 rows in seed stitch (Rows 1 & 2: *k1, p1; repeat from * to end of row, end k1.)
K1, p1, yo, p2tog, continue in seed stitch to end of row.
Work 3 rows in seed stitch.
R1: (WS): k1, p1, k1, p4, *k1, p3; repeat from * to last 4 sts, end p1, k1, p1, k1.
R2: k1, p1, k1, p1, *k1, (yo, k1) 2X, p1; repeat from * to last 3 sts, end k1, p1, k1. (79 stitches)
R3: k1, p1, k1, p6, *k1, p5; repeat from * to last 4 sts, end p1, k1, p1, k1.
R4: k1, p1, k1, p1, *k2, yo, k1, yo, k2, p1; repeat from * to last 3 sts, end k1, p1, k1. (103 sts)
R5: k1, p1, k1, p8, *k1, p7; repeat from * to last 4 sts, end p1, k1, p1, k1.
R6: k1, p1, k1, p1, *k7, p1; repeat from * to last 3 sts, end k1, p1, k1.
R7: Repeat row 5.
R8:k1, p1, k1, p1, *k3, yo, k1, yo, k3, p1; repeat from * to last 3 sts, end k1, p1, k1. (127 sts)
R9: k1, p1, k1, p10, *k1, p9; repeat from * to last 4 sts, end p1, k1, p1, k1.
R10: (buttonhole row) k1, p1, k1, p1, *k9, p1; repeat from * to last 13 sts, end k9, p2tog, yo, p1, k1.
R11: Repeat row 9.
R12:k1, p1, k1, p1, *k4, yo, k1, yo, k4, p1; repeat from * to last 3 sts, end k1, p1, k1. (151 sts)
R13:k1, p1, k1, p12, *k1, p11; repeat from * to last 4 sts, end p1, k1, p1, k1.
R14:k1, p1, k1, p1, *k11, p1; repeat from * to last 3 sts, end k1, p1, k1.
R15: Repeat row 13.
R16:k1, p1, k1, *p1, yo, ssk, k7, k2tog, yo; repeat from * to last 4 sts, end p1, k1, p1, k1. (151 sts--stitch count unchanged)
R17:k1, p1, k1, p1, k1, *p9, k3; repeat from * to last 14 sts, end p9, k1, p1, k1, p1, k1.
R18:k1, p1, k1, p2, yo, ssk, k5, k2tog, *yo, p3, yo, ssk, k5, k2tog; repeat from * to last 5 sts, end yo, p2, k1, p1, k1.
R19:k1, p1, k1, p1, k2, p7, *k2, p1, k2, p7; repeat from * to last 6 sts, end k2, p1, k1, p1, k1.
R20: k1, p1, k1, p3, yo, ssk, k3, k2tog, *yo, p2, k1, p2, yo, ssk, k3, k2tog; repeat from * to last 6 sts, end yo, p3, k1, p1, k1.
R21:k1, p1, k1, p2, k2, p5, *k2, p3, k2, p5; repeat from * to last 7 sts, end k2, p2, k1, p1, k1.
R22:k1, p1, k1, p1, k1, p2, yo, ssk, k1 k2tog, *yo p2, k3, p2, yo, ssk, k1, k2tog; repeat from * to last 7 sts, end yo, p2, k1, p1, k1, p1, k1.
R23: (buttonhole row): k1, p1, yo, p2tog, p2, k2, p3, *k2, p5, k2, p3; repeat from * to last 8 sts, end k2, p3, k1, p1, k1.
R24: k1, p1, k1, p1, k2, p2, yo, sl-k2tog-psso, *yo, p2, k5, p2, yo, sl-k2tog-psso; repeat from * to last 8 sts, end yo, p2, k2, p1, k1, p1, k1.
R25: k1, p1, k1, p4, k2, p1, *k2, p7, k2, p1;* to last 9 sts, end k2, p4, k1, p1, k1.
R26:k1, p1, k1, p1, k to last 4 sts, end p1, k1, p1, k1.

(You can click on the chart to enlarge it.)

You should still have 151 sts on the needle at this point.

Sleeves:
R1: k1, p1, k1, p15. Slip next 36 sts onto a stitch holder, p43, slip next 36 sts onto stitch holder, p15, k1, p1, k1.
R2: k1, p1, k1, p1, k13, m1, place marker, k1, k stitch on left needle across from held stitches, place marker, m1, k41, m1, place marker, k1, k stitch on left needle across from held stitches, place marker, m1, k13, p1, k1, p1, k1. (83 sts on needle).
R3: k1, p1, k1, p to last 3 sts, end k1, p1, k1.
R4: k1, p1, k1, p1, k to marker, m1, sl marker, k2, sl marker, m1, k to marker, m1, sl marker, k2, sl marker, m1, k to last 4 sts, end p1, k1, p1, k1.

Repeat rows 3 & 4 two times more.

R5: k1, p1, k1, p to last 3 sts, end k1, p1, k1.
R6: (buttonhole row) k1, p1, k1, p1, k to last 4 sts, end p2tog, yo, p1, k1.

Repeat rows 3-6 until piece measures 8.5, 10.5, (12.5) inches from back of neck, or whatever length you prefer.
AT THE SAME TIME, after your first row 6, every 13 rows/every two inches, create a buttonhole as you have done throughout.

Knit 3 rows in seed stitch.
Work buttonhole row in seed stitch.
Knit 2 rows in seed stitch.

BO all sts.

Sleeves, continued:

Place held stitches for right sleeve on needle.
With RS facing, attach yarn.
K1, ssk, k to last 3 sts, k2tog, k1.
Purl one row.
Work three rows in seed stitch.
BO all sts.

Repeat for left sleeve.

Sew sleeve seams, stitch up arm holes under the arms. Weave in all ends. Block as needed, and sew on buttons opposite buttonholes.

Thứ Tư, 28 tháng 9, 2011

Paper crafts for gifts: Heart Punch 3 D Flower Tutorial


Paper crafts for gifts: Heart Punch 3 D Flower Tutorial
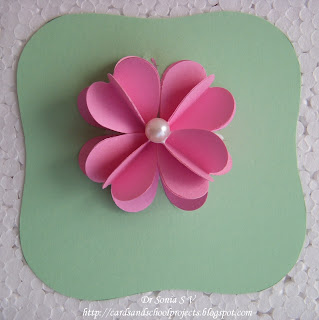
This large 3 D flower is made by sticking hearts together.
Materials required
Hearts 16
Heart Punch
Glue

 1. Fold the hearts in half vertically

Heart Punch Craft Ideas
2. Apply glue to the under- surface of one heart and stick it to 2 other hearts as shown
Heart Punch flower making
3.This is a 3 hearts 3 D heart which pops up and also folds flat .This can be used as such to adorn your cards and other creations for decoration.
Heart Punch Flower Petals
4.Apply glue to the undersurface of one end petal of the above and stick it to another heart.
4 hearts Heart Flower Petal
5. Now you get a "4" hearts petal
Heart Flower Petal Tutorial
6.Make 4 such petals using 16 hearts in all. Using a heart punch makes this a fast job.

Heart Punch Ideas
7. Apply glue on the tip and side edges of the petals made in 5 and 6
Heart Punch Flower Petal
8. Arrange your petals and allow the glue to dry.My favorite glue is white glue which dries transparent.
Heart Flowers

Heart Flowers Tutorial
 9.Put a bead,pearl,quilled shape at the center.
3 D Paper Flower
10.I cut leaves from corrugated paper to complement the flower.Do try these flowers.
Paper Flower Making